Saturday, 22 June 2024

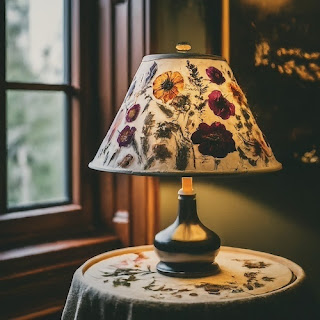
Flower Lamp Shade


Pressed Flower  Lamp

Materials:

Lamp with a plain fabric or paper shade (avoid flammable materials)

Variety of pressed flowers in different colours, shapes, and sizes (such as daisies, ferns, baby's breath)

Fabric stiffener (optional)

Scissors

Craft glue (thin and clear recommended)

Small paintbrush

Mod Podge or clear coat spray (optional)

Ruler (optional)

Pencil (optional)

Instructions:

  1. Gather Your Supplies: Choose a lamp with a plain lampshade that allows light to pass through. Gather your pressed flowers and ensure they are completely dry and flat.
  2. Plan Your Design (Optional): You can create a freeform collage or plan a more structured design beforehand. If you prefer a structured design, sketch a layout on a separate piece of paper using a ruler and pencil.
  3. Apply Fabric Stiffener (Optional): This step is optional but can help stiffen a flimsy lampshade and make it easier to adhere the flowers. Follow the instructions on the fabric stiffener and allow the shade to dry completely.
  4. Arrange the Flowers: Lay out your pressed flowers on a flat surface to visualise your design. Experiment with different combinations and placements until you find a captivating arrangement that complements the shape of the lampshade.
  5. Attach the Flowers: Using a small paintbrush, carefully apply a thin layer of craft glue to the back of each flower. Gently press the flower onto the desired location on the lampshade. Hold it for a few seconds to ensure a secure bond.
  6. Build Layers and Dimension: Start with larger pressed flowers as a base layer and gradually add smaller ones and delicate greenery on top for a layered effect and added depth.
  7. Filling in Gaps: Once you've attached most of the flowers, take a step back and assess your lampshade. Fill in any empty spaces with additional small flowers or greenery to create a cohesive design.
  8. Seal the Flowers (Optional): To add extra protection and prevent dust buildup, you can apply a light coat of Mod Podge or a clear coat spray once the glue has dried completely. Allow the sealant to dry thoroughly before using the lamp.

Tips:

  • Use a variety of pressed flowers in different colours, shapes, and textures for a visually interesting lampshade.
  • Work with small amounts of glue to avoid creating visible marks on the flowers or lampshade.
  • If a flower is particularly delicate, use a toothpick dipped in glue instead of a brush.
  • Consider using a practice sheet of paper to experiment with your flower arrangement before transferring it to the lampshade.
  • Ensure the flowers you use are not flammable and won't obstruct airflow around the light bulb.
  • Pressed flowers can fade over time. To minimise this, avoid placing the lamp in direct sunlight.
  • Let your creativity flow and enjoy creating a unique and beautiful lampshade that adds a touch of floral charm to your space!

Tuesday, 18 June 2024

Rose Petal Infused Smoked Salmon


Smoked Salmon

Ingredients:

1 side (around 1-1.5 kg) fresh salmon fillet, skin on

2 cups wood chips for smoking (alder, apple, or cherrywood recommended)

1/2 cup dried rose petals (edible variety, organic preferred)

Kosher salt

Coarse black pepper


Instructions:

  1. Prepare the Salmon: Rinse the salmon fillet under cold water and pat it dry with paper towels. Generously season the flesh side with kosher salt and coarse black pepper. Wrap the salmon tightly in plastic wrap and place it in the refrigerator for at least 4 hours, preferably overnight, to allow the flavours to develop and promote a firmer texture for smoking.
  2. Prepare the Smoker: Set up your smoker according to the manufacturer's instructions. Preheat the smoker to a temperature between 165°F (74°C) and 180°F (82°C).
  3. Smoking with Rose Petals: Combine the wood chips with the dried rose petals in a large bowl. Toss to distribute evenly. Scatter half of the wood chip mixture on the bottom of the smoker tray. Place the salmon fillet, skin side down, on a wire rack positioned inside the smoker. Distribute the remaining wood chip mixture on top of the salmon.
  4. Smoking Process: Smoke the salmon for 2-3 hours, depending on the thickness of the fillet. The internal temperature of the finished salmon should reach 145°F (63°C) as measured with a food thermometer inserted into the thickest part of the flesh.
  5. Cooling and Storage: Once smoked, remove the salmon from the smoker and let it cool completely at room temperature for about 30 minutes. Wrap the cooled salmon tightly in plastic wrap and refrigerate for at least 2 hours, preferably overnight, to allow the flavours to meld further. The smoked salmon will keep refrigerated for up to 1 week.

Tips:

  • Use edible rose petals specifically for culinary purposes. Avoid using store-bought rose petals or those treated with pesticides.
  • Experiment with different wood chips to find your preferred smoke flavour profile. Hickory or oak will add a stronger smoke flavour that may overpower the rose petals.
  • If using a cold smoker, adjust the smoking time accordingly. Colder smoking takes longer but results in a milder smoke flavour.
  • When slicing the smoked salmon, use a sharp knife with a long, thin blade for clean and even cuts.

Nutrition Information (per 100g serving):

  • Calories: 205
  • Fat: 12g (of which 3g saturated)
  • Protein: 22g
  • Carbs: 0g
  • Sodium: Depending on amount used while salting
  • Cholesterol: 55mg

Enjoy your unique and flavourful Rose Petal Infused Smoked Salmon!


Monday, 17 June 2024

DIY Bookmark with Pressed Flower


Pressed Flower Bookmark

Materials:

Thick craft paper or card stock (choose a colour that complements your flowers)

Variety of pressed flowers (such as pansies, buttercups, small leaves, ferns)

Scissors

Clear contact paper or laminating sheets

Hole punch (optional)

Ribbon (optional)

Heavy books or flower press (optional)


Instructions:

  1. Pressing Flowers (Optional): If you don't have pressed flowers readily available, you can press your own. Gather fresh flowers and leaves, ensuring they are completely dry and free of moisture. Place them between sheets of absorbent paper (like blotting paper) and layer them between heavy books or use a flower press. Leave them undisturbed for several weeks until they are completely dry and flat.
  2. Cut the Bookmark Shape: Cut a desired shape for your bookmark from the craft paper or card stock. Rectangles are classic, but you can get creative with rounded corners or other shapes.
  3. Arrange the Flowers: Lay out your pressed flowers on a flat surface to plan your design. Experiment with different combinations and placements until you find an arrangement you like. Consider colour balance, size variation, and overall composition.
  4. Secure the Flowers: Carefully position the pressed flowers onto your paper bookmark. You can use a small amount of craft glue to temporarily hold them in place while you secure them with the clear contact paper or laminating sheets.
  5. Apply the Finishing Touch: Cut a piece of clear contact paper or laminating sheet slightly larger than your bookmark. Carefully peel back the liner and centre it over the bookmark and pressed flowers. Smooth out any air bubbles with a credit card or squeegee for a clear and even finish. You can use a second sheet of laminating film for extra protection and rigidity (optional). Trim the excess contact paper or laminate around the edges of the bookmark with scissors.
  6. Punch a Hole (Optional): If you want to add a ribbon for hanging, use a hole punch to create a small hole at the top of the bookmark.
  7. Tie a Ribbon (Optional): Cut a length of ribbon and thread it through the hole. Tie a decorative bow and trim the remaining ribbon ends.
  8. Let it Dry: Allow the glue (if used) and laminate to dry completely before using your bookmark.

Tips:

  • Use a variety of pressed flowers in different colours, shapes, and sizes for a visually interesting bookmark.
  • Work with small amounts of glue to avoid creating visible marks on the flowers or paper.
  • Consider using a practice sheet of paper to experiment with your flower arrangement before transferring it to the final bookmark.
  • If a flower is particularly delicate, use a toothpick dipped in glue instead of applying it directly.
  • Pressed flowers can fade over time. To minimise this, avoid storing your bookmark in direct sunlight.

Embrace your creativity! This project allows for endless customisation. Explore different flower combinations, shapes, and embellishments to create unique and personalised bookmarks that are a joy to use and a delight to behold.


Friday, 14 June 2024

Indonesian Curry Chicken


Curry Chicken

Ingredients:

For the Curry Paste:

3 shallots, peeled and roughly chopped

3 cloves garlic, peeled and roughly chopped

1 inch fresh ginger, peeled and roughly chopped

2 red chilies (deseeded for a milder curry, or leave seeds for more heat), roughly chopped

1 stalk lemongrass, white bulb only, roughly chopped

1 teaspoon coriander seeds

½ teaspoon cumin seeds

½ teaspoon turmeric powder

½ teaspoon ground paprika

¼ teaspoon ground cinnamon

1 kaffir lime leaf, torn

Vegetable oil, for grinding

  • For the Curry:
    • 1 ½ tablespoons vegetable oil
    • 1 bay leaf
    • 2 cloves
    • 2 green cardamoms
    • 1 cinnamon stick
    • 1 star anise (optional)
    • 1 kg bone-in, skin-on chicken thighs (or breasts, cut into pieces)
    • 400 ml coconut milk
    • 1 cup water
    • 2 tablespoons tamarind paste diluted with 1/4 cup water
    • 1 tablespoon palm sugar (or brown sugar)
    • 1 teaspoon fish sauce (optional)
    • Salt to taste
    • 2 potatoes, peeled and cut into wedges (optional)
    • 1 carrot, peeled and cut into thick slices (optional)
    • Handful of green beans, trimmed (optional)
    • Chopped fresh cilantro, for serving

Instructions:

  1. Make the Curry Paste: In a food processor or blender, combine shallots, garlic, ginger, chilies, lemongrass, coriander seeds, cumin seeds, turmeric, paprika, cinnamon, and kaffir lime leaf. Add a drizzle of vegetable oil to help the process if needed. Grind into a smooth paste.
  2. Heat the Oil and Add Aromatics: Heat vegetable oil in a large pot or Dutch oven over medium heat. Add the bay leaf, cloves, cardamoms, cinnamon stick, and star anise (if using). Saute for 30 seconds, until fragrant.
  3. Saute the Curry Paste: Add the curry paste to the pot and cook, stirring constantly, for 5-7 minutes. The paste should become fragrant and release its oils.
  4. Brown the Chicken: Add the chicken pieces to the pot and cook, stirring occasionally, until browned on all sides.
  5. Simmer the Curry: Pour in the coconut milk, water, tamarind water, palm sugar, and fish sauce (if using). Bring to a simmer, then reduce heat to low, cover the pot, and simmer for 30-40 minutes, or until the chicken is cooked through and tender.
  6. Add Vegetables (Optional): If using, add the potatoes, carrots, and green beans to the pot and simmer for an additional 10-15 minutes, or until the vegetables are tender-crisp.
  7. Adjust Seasoning: Season the curry with salt to taste.
  8. Serve: Garnish with chopped fresh cilantro and serve hot over steamed rice.

Nutrition Tips:

  • Lean Protein: Use skinless chicken breasts for a lower-fat option.
  • Healthy Fats: Coconut milk adds a creamy texture, but it's also high in saturated fat. Use light coconut milk to reduce the fat content.
  • Veggie Power: Add a variety of vegetables like bell peppers, zucchini, or green beans for extra nutrients and fibre.
  • Spice Control: Adjust the chilies in the curry paste according to your spice preference.
  • Sugar Savvy: Palm sugar is a natural sweetener, but you can use less or a substitute like stevia for a lower-sugar version.
  • Portion Control: This curry is rich and flavourful, so be mindful of portion sizes.
  • Healthy Carbs: Serve with brown rice or quinoa for a more balanced and fibre-rich meal.

Enjoy this delicious and fragrant Indonesian Chicken Curry!

Thursday, 13 June 2024

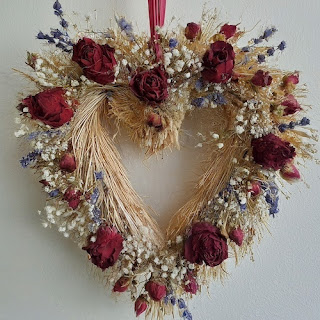
Valentine's Day Straw Heart


Rustic Charm

Materials:

Straw wreath base (various sizes available)

Floral wire (thin and thick gauges)

Wire cutters

Dried flowers:

Red roses (different sizes)

Red rosebuds

White baby's breath

Purple sea lavender

Purple larkspur (optional: other blue or purple flowers)

  • Ribbon in a Valentine's Day colour (red, pink, white with red hearts)
  • Scissors
  • Hot glue gun (optional)

Instructions:

  1. Prepare the Dried Flowers: If necessary, trim the stems of the dried flowers to a manageable length. You can leave some longer for a more natural look or keep them shorter for a tighter arrangement.
  2. Secure the Ribbon: Cut a length of ribbon long enough to wrap around the wreath and create a bow. Thread one end of the ribbon through the inner straw ring of the wreath and secure it with a piece of floral wire twisted tightly. Wrap the ribbon around the wreath, tucking it under the straw as you go for a neat finish. Tie a bow and secure the remaining ribbon tail with floral wire.
  3. Attaching Larger Flowers (Roses): For the roses, use the thicker floral wire. Cut a piece of wire and wrap one end around the stem of a rose securely. Twist the excess wire to create a small hook. Find a spot on the wreath where you want the rose and gently push the hook into the straw. Wrap the remaining floral wire around a nearby straw section to secure the rose in place. Repeat this process for other large flowers like rosebuds.
  4. Adding Smaller Flowers: Use the thinner floral wire for smaller and more delicate flowers like baby's breath, sea lavender, and larkspur. You can twist a few stems together and secure them with a piece of wire before attaching them to the wreath. Push the wired end into the straw and wrap the excess wire around a nearby straw section for a secure hold.
  5. Building Layers and Dimension: Start with larger flowers like roses towards the back for a base layer. Layer smaller flowers and baby's breath in front for added texture and visual interest.
  6. Filling in Gaps: Once you've attached most of the flowers, take a step back and assess your wreath. Fill in any empty spaces with additional baby's breath, sea lavender, or larkspur.
  7. Optional Hot Glue: If some flowers are particularly fragile or difficult to secure with wire, you can use a small dab of hot glue to adhere them to the straw wreath.
  8. Let Your Creativity Shine! The beauty of this project lies in its customisation. Experiment with different flower combinations, placement, and ribbon colours to create a Valentine's Day wreath that reflects your unique style.

Tips:

  • Choose dried flowers in various sizes and textures for a more visually interesting wreath.
  • Work gently with dried flowers as they can be fragile.
  • Secure the floral wire tightly to ensure the flowers stay in place over time.
  • Consider using a variety of purples and blues for the larkspur or other flowers to create a colour palette that complements the red roses.
  • If using hot glue, be sparing to avoid damaging the dried flowers.
  • Allow the glue to dry completely before hanging the wreath.
  • Display your beautiful creation on a door, wall, or window for a touch of rustic Valentine's Day charm!

Tuesday, 11 June 2024

The Classic Cobb Salad


Cobb Salad

Ingredients:

Protein:

4 ounces boneless, skinless chicken breast, cooked and chopped

2 hard-boiled eggs, quartered

4 slices crisp cooked bacon, crumbled

Greens:

6 cups mixed greens (combination of romaine, green leaf lettuce, or baby spinach)


Veggies:

    • 1 avocado, halved, pitted, and sliced
    • 1 ripe tomato, chopped
    • ½ cup crumbled blue cheese (Roquefort or Gorgonzola)
    • ½ red onion, thinly sliced (optional)
  • Dressing:
    • ¼ cup red wine vinegar
    • 1 tablespoon olive oil
    • 1 tablespoon Dijon mustard
    • 1 teaspoon honey
    • Salt and freshly ground black pepper to taste
  • Optional Additions:
    • Chopped chives for garnish
    • Diced cucumber

Instructions:

  1. Prepare the Protein: If not already cooked, grill, bake, or poach the chicken breast. Once cool, chop it into bite-sized pieces. Hard-boil the eggs and quarter them. Cook the bacon slices until crisp, then crumble them.
  2. Assemble the Salad: In a large bowl, layer the mixed greens. Arrange the chopped chicken, quartered eggs, and crumbled bacon in separate sections across the top of the greens.
  3. Add the Veggies: Scatter the sliced avocado, chopped tomato, and crumbled blue cheese over the salad. If using, add the thinly sliced red onion.
  4. Make the Dressing: In a small jar or bowl, whisk together the red wine vinegar, olive oil, Dijon mustard, and honey. Season with salt and pepper to taste.
  5. Dress and Serve: Drizzle the dressing over the salad just before serving. Garnish with chopped chives, if desired.

Nutrition Tips:

  • Lean Protein: Use skinless chicken breast for a good source of protein without excess fat.
  • Healthy Fats: Opt for olive oil in the dressing and limit the amount of blue cheese, which is high in saturated fat.
  • Creamy Alternative: If you find avocado too high in fat, consider using a dollop of low-fat Greek yogurt for a touch of creaminess.
  • Veggie Power: Incorporate a variety of colourful vegetables like cucumbers or bell peppers for extra nutrients and fibre.
  • Dressing Control: The dressing can be high in calories due to the oil and honey. Consider making a smaller batch or using a light hand when drizzling.
  • Portion Awareness: Cobb salad can be filling, so be mindful of portion sizes, especially with richer ingredients like bacon and blue cheese.
  • Whole-Wheat Boost: Serve the salad on a bed of whole-wheat bread crumbs for added fibre and texture.

Enjoy this delicious and satisfying Cobb salad - a perfect balance of protein, healthy fats, and fresh flavours!

A Whimsical Tulip

  A Whimsical Tulip This is not a simple tulip, but a fantastical bloom sprung from a world of imagination. Each of its petals is a canvas o...