Saturday, 7 December 2024

Christmas Bathroom Decorations


Christmas Bathroom Decorations

Christmas Bathroom Decorations: A Festive Guide

Christmas is a time for joy, celebration, and spreading holiday cheer. While we often focus on decorating the living room and dining room, the bathroom can also be transformed into a festive space. Here are some ideas for Christmas bathroom decorations, materials, flowers, and green names, along with instructions and tips to help you create a festive atmosphere.

Materials:

  • Festive garland: Choose a garland with Christmas colours like red, green, or gold. You can use a traditional garland made of pine needles or opt for a more modern version made of felt or fabric.
  • Ornaments: Hang small Christmas ornaments on the garland or place them in a decorative bowl on the counter.
  • Candles: Use battery-operated candles to avoid open flames in the bathroom. Place them in a decorative holder or on a tray with other festive items.
  • Towels: Replace your regular towels with festive Christmas-themed towels. You can find towels with Christmas patterns, colours, or characters.
  • Bath mats: Add a festive touch to your bathroom with a Christmas-themed bath mat. You can find bath mats with Christmas patterns, colours, or characters.
  • Soap dispenser: Replace your regular soap dispenser with a festive Christmas-themed one. You can find soap dispensers in the shape of Christmas trees, Santa Claus, or other holiday characters.
  • Hand towels: Hang festive hand towels on the towel rack. You can find hand towels with Christmas patterns, colours, or characters.
  • Flowers: Add a touch of nature to your bathroom with fresh or artificial Christmas flowers. Poinsettia, amaryllis, and holly are all popular choices.
  • Green names: Incorporate festive green names into your decorations, such as using greenery like pine needles or holly leaves.
  • Instructions:
  • 1. Start by cleaning your bathroom thoroughly. This will help your decorations stand out and create a fresh and inviting atmosphere.
  • 2. Hang a festive garland around the mirror or along the towel rack. You can also drape the garland over the shower curtain rod.
  • 3. Add some Christmas ornaments to the garland or place them in a decorative bowl on the counter.
  • 4. Place battery-operated candles in a decorative holder or on a tray with other festive items.
  • 5. Replace your regular towels with festive Christmas-themed towels.
  • 6. Add a festive touch to your bathroom with a Christmas-themed bath mat.
  • 7. Replace your regular soap dispenser with a festive Christmas-themed one.
  • 8. Hang festive hand towels on the towel rack.
  • 9. Add a touch of nature to your bathroom with fresh or artificial Christmas flowers.
  • 10. Incorporate festive green names into your decorations, such as using greenery like pine needles or holly leaves.

Tips:

  • Keep it simple. Don't overdo it with decorations. A few well-placed items can make a big impact.
  • Use battery-operated candles to avoid open flames in the bathroom.
  • Choose decorations that are easy to clean.
  • Incorporate personal touches. Add photos of family and friends or other meaningful items to your decorations.
  • Have fun and enjoy the process of decorating your bathroom for Christmas!

By following these tips and ideas, you can create a festive and inviting Christmas bathroom that will bring joy and cheer to your holiday season.

Spiced Apple Cider


Spiced Apple Cider

Spiced Apple Cider

Spiced Apple Cider is a warm and comforting drink, perfect for cozy fall and winter days. It's a simple and delicious way to enjoy the flavours of the season.

Ingredients:

  • 1 gallon apple cider
  • 1 orange, sliced
  • 1 lemon, sliced
  • 10 whole cloves
  • 5 cinnamon sticks
  • 1 teaspoon whole black peppercorns
  • 1/2 teaspoon ground nutmeg
  • 1/4 teaspoon ground ginger

Instructions:

  1. Combine Ingredients: In a large pot, combine apple cider, orange slices, lemon slices, cloves, cinnamon sticks, black peppercorns, nutmeg, and ginger.
  2. Heat the Cider: Bring the mixture to a boil over high heat.
  3. Simmer: Reduce heat to low and simmer for 20-30 minutes, or until the flavours are fully infused.
  4. Strain and Serve: Strain the cider to remove the spices and fruit. Serve hot.

Nutrition Information (Approximate per serving):

The nutritional information for Spiced Apple Cider can vary depending on the specific ingredients and serving size. However, it's generally low in calories and fat.

Tips:

  • Add sweetness: If you prefer a sweeter cider, you can add honey, maple syrup, or brown sugar to taste.
  • Spice it up: Experiment with different spices to create your own unique flavour combinations. Consider adding star anise, cardamom, or allspice.
  • Garnish: For a festive touch, garnish your cider with cinnamon sticks, orange slices, or apple slices.
  • Make it alcoholic: For a warming adult beverage, add a shot or two of your favourite spirit, such as brandy, rum, or whiskey.
  • Slow Cooker: For a hands-off approach, you can simmer your cider in a slow cooker for several hours.

Enjoy your warm and cozy Spiced Apple Cider!


Friday, 6 December 2024

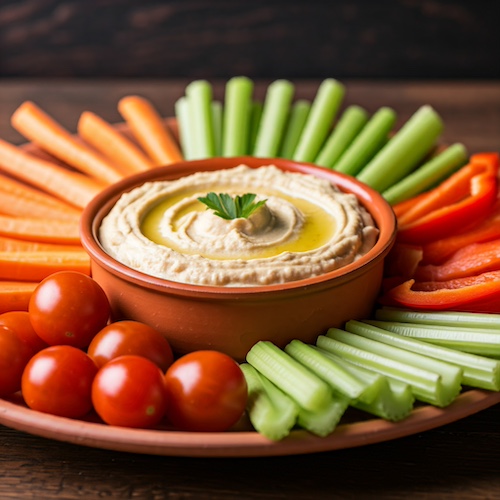
Hummus and Vegetable Platter


Hummus and Vegetable Platter

Hummus and Vegetable Platter

Hummus and Vegetable Platter is a healthy and delicious snack or appetiser that is perfect for any occasion. It is easy to make and can be customised to your liking.

Ingredients:

  • For the Hummus:
    • 1 (15-ounce) can chickpeas, rinsed and drained
    • 1/4 cup tahini
    • 1/4 cup lemon juice
    • 1/4 cup olive oil
    • 2 cloves garlic, minced
    • 1/2 teaspoon salt
    • 1/4 teaspoon ground cumin
    • 1/4 teaspoon paprika
  • For the Vegetable Platter:
    • 1 carrot, sliced
    • 1 celery stalk, sliced
    • 1 red bell pepper, sliced
    • 1 cucumber, sliced
    • 1 cup cherry tomatoes, halved
    • 1/4 cup chopped fresh parsley

Instructions:

  1. Make the Hummus:
    • Combine all ingredients in a food processor and process until smooth.
    • Add water as needed to reach your desired consistency.
    • Taste and adjust seasoning as needed.
  2. Assemble the Platter:
    • Arrange the vegetables on a platter.
    • Place the bowl of hummus in the centre of the platter.
    • Garnish with parsley.

Nutrition Information:

  • Calories: 200
  • Protein: 8g
  • Fat: 12g
  • Carbohydrates: 15g

Tips:

  • You can use a variety of vegetables for your platter. Some other good options include broccoli florets, cauliflower florets, and green beans.
  • You can also add other toppings to your hummus, such as chopped olives, feta cheese, or pine nuts.
  • If you want a spicier hummus, add a pinch of cayenne pepper or red pepper flakes to the food processor.
  • To make the hummus ahead of time, store it in an airtight container in the refrigerator for up to 3 days.

Additional tips:

  • For a creamier hummus, use a combination of chickpeas and tahini.
  • To make a vegan hummus, use olive oil instead of tahini.
  • For a healthier hummus, use a low-fat tahini.
  • To make a sweeter hummus, add a teaspoon of honey or maple syrup.

I hope you enjoy this recipe!

A Festive Christmas Kitchen


A Festive Christmas Kitchen

A Festive Christmas Kitchen

The kitchen, the heart of the home, deserves its share of Christmas cheer. Here's how to transform your kitchen into a festive space:

Materials:

  • Festive Garland: A classic Christmas decoration, a garland can be hung over cabinets, along a windowsill, or across a doorway. Choose a traditional pine garland or opt for a more modern, colourful one.
  • Ornaments: Add a touch of sparkle to your kitchen by hanging ornaments from the garland or placing them in a decorative bowl.
  • Candles: Use battery-operated candles for safety, especially near curtains or other flammable materials. Place them in a decorative holder or on a tray with other festive items.
  • Table Runner: A festive table runner can instantly transform your kitchen table. Choose a Christmas-themed pattern or colour.
  • Tableware: Festive tableware, such as plates, napkins, and cutlery, can add a touch of holiday cheer to your meals.
  • Flowers: Fresh or artificial Christmas flowers, like poinsettias or amaryllis, can brighten up your kitchen.
  • Green Names: Incorporate festive green names into your decorations, such as using greenery like pine needles or holly leaves.

Instructions:

  1. Hang a festive garland: Drape it over cabinets, along a windowsill, or across a doorway.
  2. Add ornaments: Hang them from the garland or place them in a decorative bowl.
  3. Set the mood with candles: Place battery-operated candles in a decorative holder or on a tray.
  4. Dress up your table: Lay a festive table runner and set the table with Christmas-themed tableware.
  5. Incorporate fresh flowers: Place a vase of Christmas flowers on your kitchen counter or table.
  6. Add greenery: Use pine needles, holly leaves, or other greenery to create festive arrangements.

Tips:

  • Keep it simple: A few well-placed decorations can make a big impact.
  • Use battery-operated candles for safety.
  • Choose decorations that are easy to clean.
  • Incorporate personal touches: Add family photos or other meaningful items to your decorations.
  • Have fun and enjoy the process of decorating your kitchen for Christmas!

By following these tips, you can create a festive and inviting kitchen that will make your Christmas celebrations even more special.

Thursday, 5 December 2024

Decorated Cake Idea: Christmas Joy


Cake for Christmas Gift

Floral Christmas Tree Topper


Floral Christmas Tree Topper

Crafting a Floral Christmas Tree Topper

A floral Christmas tree topper is a beautiful and unique way to adorn the top of your Christmas tree. This guide will walk you through the steps of creating your own stunning topper, using either fabric or dried flowers.

Materials:

For Fabric Flower Topper:

  • Fabric: Felt, satin, or any other fabric of your choice
  • Floral Wire: Thin and flexible
  • Scissors: For cutting fabric and wire
  • Needle and Thread: For sewing the flowers together
  • Hot Glue Gun and Glue Sticks: For attaching the flowers to the base

For Dried Flower Topper:

  • Dried Flowers: Roses, hydrangeas, or other dried flowers of your choice
  • Floral Foam: A small piece to hold the flowers
  • Wire Mesh: To cover the floral foam
  • Ribbon: To tie around the base of the topper

Instructions:

Fabric Flower Topper:

  1. Create the Flowers: Cut out fabric shapes for your flowers (e.g., circles, ovals).
  2. Assemble the Flowers: Sew the fabric shapes together, leaving a small opening.
  3. Fill the Flowers: Stuff the flowers with cotton or polyester filling.
  4. Close the Flowers: Sew the opening closed.
  5. Attach the Flowers: Use hot glue to attach the flowers to a circular base made of floral wire or cardboard.
  6. Add Accents: Add ribbons, beads, or other decorations to the topper.

Dried Flower Topper:

  1. Prepare the Base: Cut a small piece of floral foam and cover it with wire mesh.
  2. Arrange the Flowers: Arrange the dried flowers on the floral foam, creating a desired shape (e.g., a bouquet, a wreath).
  3. Secure the Flowers: Use floral wire to secure the flowers to the foam.
  4. Add a Ribbon: Tie a ribbon around the base of the topper to hang it on your tree.

Tips for a Perfect Floral Topper:

  • Choose Your Style: Consider your tree's style and colour scheme when selecting flowers and materials.
  • Use High-Quality Materials: High-quality materials will ensure your topper lasts longer.
  • Experiment with Colours: Use a variety of colours and textures to create a unique and eye-catching topper.
  • Secure the Topper: Make sure your topper is securely attached to the top of your tree.
  • Preserve Dried Flowers: To preserve dried flowers, store them in a cool, dry place.
  • Get Creative: Don't be afraid to experiment with different shapes, sizes, and colours.

By following these steps and tips, you can create a beautiful and unique floral Christmas tree topper that will add a touch of elegance to your holiday decor.

Wednesday, 4 December 2024

Mini Quiche Lorraine

Mini Quiche Lorraine

 Mini Quiche Lorraine

Mini Quiche Lorraine is a delightful bite-sized version of the classic French dish. It's perfect for parties, brunches, or a quick and satisfying meal. The rich, savoury filling and flaky crust make it a crowd-pleaser.

Ingredients:

For the crust:

  • 1 package (10 ounces) frozen puff pastry sheets, thawed
  • 1 egg, beaten

For the filling:

  • 4 slices bacon, cooked and crumbled
  • 1/2 cup grated Gruyère cheese
  • 1/4 cup heavy cream
  • 2 large eggs
  • 1/4 teaspoon salt
  • 1/8 teaspoon black pepper

Instructions:

  1. Preheat oven: Preheat your oven to 400°F (200°C).
  2. Prepare the crust: Roll out the thawed puff pastry sheets on a lightly floured surface. Cut out circles using a 3-inch round cutter. Place the circles in muffin tin cups.
  3. Brush with egg: Brush the edges of the pastry with the beaten egg.
  4. Add filling: In a bowl, combine the crumbled bacon, grated cheese, heavy cream, eggs, salt, and pepper. Mix well.
  5. Fill the crusts: Divide the filling evenly among the pastry cups, filling them about 3/4 full.
  6. Bake: Bake in the preheated oven for 15-20 minutes, or until the filling is set and the crust is golden brown.
  7. Cool and serve: Let the quiches cool slightly in the tin before serving.

Nutrition Information (per serving):

  • Calories: 150-200
  • Protein: 8-10g
  • Fat: 10-15g
  • Carbohydrates: 10-15g

Tips:

  • Pre-bake the crust: For a crispier crust, pre-bake the pastry shells for 5-7 minutes before adding the filling.
  • Add vegetables: Customise your quiches by adding your favourite vegetables, such as spinach, mushrooms, or onions.
  • Use different cheese: Experiment with different types of cheese, such as cheddar, Swiss, or goat cheese.
  • Make ahead: You can make the quiche filling in advance and store it in the refrigerator. Assemble the quiches just before baking.
  • Freeze for later: Freeze the unbaked quiches for future enjoyment. Thaw them completely before baking.

Enjoy your delicious Mini Quiche Lorraine!


Decorated Cake Idea: The Pet Portrait Cake

  The Pet Portrait cake is a sophisticated, multi-tiered confection that features a heartwarming, personalised surprise. While the overall ...