Tuesday, 3 December 2024

Christmas Floral Crown


Christmas Floral Crown

Crafting a Festive Christmas Floral Crown

A Christmas floral crown is a beautiful and versatile decoration that can be used to adorn your home or as a unique gift. This guide will walk you through the steps of creating your own stunning crown, from material selection to final touches.

Materials:

  • Fresh Evergreen Branches:
    • Pine
    • Fir
    • Cedar
  • Red Berries:
    • Holly berries
    • Cranberries
  • Pine Cones:
    • Various sizes and shapes
  • Floral Wire:
  • Wire Cutters:
  • Ribbon:
    • Red, green, or gold

Instructions:

  1. Create the Base:
    • Bend a piece of floral wire into a circular shape, ensuring it's sturdy enough to hold the greenery.
  2. Attach the Greenery:
    • Begin by attaching the longest evergreen branches to the wire base.
    • Use floral wire to secure the branches, wrapping it tightly around the wire base and the stems of the greenery.
  3. Fill in the Gaps:
    • Fill in any gaps with shorter branches, ensuring the crown is full and lush.
  4. Add Berries and Pine Cones:
    • Use floral wire to attach the red berries and pine cones to the crown.
    • Arrange them strategically to create a balanced and visually appealing design.
  5. Finish with a Ribbon:
    • Tie a ribbon around the base of the crown to add a festive touch.

Tips for a Perfect Crown:

  • Choose Fresh Greenery: Ensure the evergreen branches are fresh and vibrant.
  • Vary the Texture: Combine different types of greenery to add depth and interest to your crown.
  • Play with Colour: Incorporate other colours, such as gold or silver, with ribbons or ornaments.
  • Secure the Elements: Use floral wire to securely attach all elements to the base.
  • Experiment with Shapes: Create different shapes, such as oval or heart-shaped crowns.
  • Preserve Your Crown: If you want to preserve your crown, consider spraying it with a botanical preservative.

By following these steps and tips, you can create a stunning Christmas floral crown that will bring holiday cheer to your home.


Mini Caprese Salad


Mini Caprese Salad

Mini Caprese Salad

Mini Caprese Salad is a classic Italian dish that is perfect for appetisers, side dishes, or even a light lunch. It's a simple combination of fresh tomatoes, mozzarella, and basil, drizzled with balsamic glaze.

Ingredients:

  • Cherry tomatoes
  • Fresh mozzarella, cut into small cubes
  • Fresh basil leaves
  • Balsamic glaze
  • Extra virgin olive oil
  • Salt and pepper to taste

Instructions:

  1. Assemble the salad:
    • Arrange cherry tomatoes, mozzarella cubes, and fresh basil leaves on a plate or skewer.
  2. Drizzle the dressing:
    • Drizzle balsamic glaze and extra virgin olive oil over the salad.
  3. Season:
    • Sprinkle with salt and pepper to taste.

Nutrition Information (Approximate per serving):

  • Calories: 50-70
  • Protein: 5-7g
  • Fat: 5-8g
  • Carbohydrates: 3-5g

Tips:

  • Use fresh ingredients: The quality of the ingredients will greatly impact the flavour of the salad.
  • Experiment with balsamic glazes: Different balsamic glazes can add different flavours to the salad. You can try white balsamic vinegar or aged balsamic vinegar.
  • Add a twist: For a more complex flavour, you can add a drizzle of pesto or a sprinkle of red pepper flakes.
  • Serve as a main course: To make a more substantial meal, serve the salad with grilled bread or a side of pasta.
  • Make ahead of time: You can assemble the salad ahead of time and store it in the refrigerator. However, add the balsamic glaze just before serving to prevent the tomatoes from becoming watery.

Enjoy your delicious and refreshing Mini Caprese Salad!

Monday, 2 December 2024

Mini Christmas Tree


Mini Christmas Tree

Mini Christmas Tree 

A mini Christmas tree decorated with traditional colours for Christmas.

Materials

  • A mini Christmas tree (real or artificial)
  • Red plastic berries
  • Red plastic ribbons
  • Blue pine
  • Gold or silver glitter
  • Hot glue gun and glue sticks
  • Scissors

Instructions

  1. Start by trimming the branches of your mini Christmas tree to create a desired shape.
  2. Cut small pieces of red plastic ribbon and tie them around the branches of the tree.
  3. Hot glue the red plastic berries to the branches of the tree.
  4. Scatter gold or silver glitter on the branches of the tree for added sparkle.
  5. Finally, add a few sprigs of blue pine to the base of the tree for a finishing touch.

Tips

  • Use a variety of red plastic berries and ribbons to add visual interest to your tree.
  • If you are using a real mini Christmas tree, be sure to water it regularly.
  • You can also add other traditional Christmas decorations to your tree, such as candy canes, ornaments, or mini presents.
  • Get creative and have fun decorating your mini Christmas tree!

Here are some additional ideas for decorating your mini Christmas tree:

  • Use different colours of ribbon, such as green or gold.
  • Add small ornaments, such as bells or stars.
  • Use different types of berries, such as holly berries or cranberries.
  • Use different types of pine, such as cedar or fir.
  • Get creative and use your imagination!

With a little creativity, you can create a beautiful and festive mini Christmas tree that will add a touch of holiday cheer to your home.

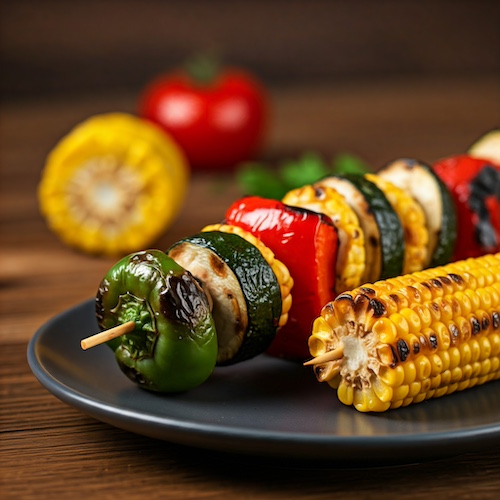
Grilled Vegetable Skewers


Grilled Vegetable Skewers

Grilled Vegetable Skewers

Grilled Vegetable Skewers are a versatile and healthy dish that can be enjoyed as a side dish, appetiser, or main course. They are easy to make and can be customised with your favourite vegetables.

Ingredients:

  • Your favourite vegetables, such as:
    • Bell peppers (red, yellow, or orange)
    • Zucchini
    • Eggplant
    • Cherry tomatoes
    • Mushrooms
    • Onions
  • Olive oil
  • Salt
  • Pepper
  • Your favourite herbs (e.g., thyme, rosemary, oregano)

Instructions:

  1. Prepare the vegetables:
    • Cut the vegetables into bite-sized pieces.
    • If using wooden skewers, soak them in water for at least 30 minutes to prevent them from burning.
  2. Assemble the skewers:
    • Thread the vegetables onto the skewers, alternating colours and types of vegetables for a visually appealing dish.
  3. Season the skewers:
    • Drizzle the skewers with olive oil and season with salt and pepper.
    • Sprinkle with your favourite herbs.
  4. Grill the skewers:
    • Preheat your grill to medium-high heat.
    • Grill the skewers for 8-10 minutes per side, or until the vegetables are tender and slightly charred.
  5. Serve:
    • Remove the skewers from the grill and serve immediately.

Nutrition Information (approximate per serving):

  • Calories: 100-150
  • Protein: 2-4g
  • Fat: 5-8g
  • Carbohydrates: 10-15g

Tips:

  • Marinate the vegetables: For extra flavour, marinate the vegetables in a mixture of olive oil, balsamic vinegar, and your favourite herbs and spices for at least 30 minutes.
  • Choose the right vegetables: Select firm, fresh vegetables for the best results.
  • Don't overcrowd the grill: Grill the skewers in batches to avoid overcrowding the grill and ensuring even cooking.
  • Add a dipping sauce: Serve the skewers with a dipping sauce, such as hummus, tzatziki, or a vinaigrette.
  • Get creative: Experiment with different vegetables and marinades to create your own unique grilled vegetable skewers.

Enjoy your delicious and healthy grilled vegetable skewers!


Sunday, 1 December 2024

Crafting a Festive Christmas Staircase Garland


Crafting a Festive Christmas Staircase Garland

Crafting a Festive Christmas Staircase Garland

A beautifully adorned staircase garland can instantly transform your home into a winter wonderland. Here's a guide to creating your own stunning garland:

Materials:

  • Base Garland:
    • Artificial evergreen garland (fir, pine, or cedar)
    • Fresh greenery (optional) - consider eucalyptus, holly, or pine sprigs
  • Decorations:
    • Christmas ornaments (various sizes and colours)
    • Ribbon (satin, velvet, or burlap)
    • Pine cones
    • Dried citrus slices (orange, lemon)
    • Cinnamon sticks
    • Berries (artificial or real)
    • Battery-operated fairy lights (optional)

Instructions:

  1. Prep the Garland:
    • Start by laying out your artificial garland on a flat surface.
    • If using fresh greenery, incorporate it into the artificial garland by wiring or tying it securely.
  2. Add the Decorations:
    • Ornaments: Hang ornaments of various sizes and colours along the garland. Use ribbon or wire to secure them.
    • Ribbon: Tie ribbons in bows or loops around the garland.
    • Natural Elements: Add pine cones, dried citrus slices, and cinnamon sticks to create a natural, rustic look.
    • Berries: Wire or glue berries onto the garland for a pop of colour.
  3. Illuminate (Optional):
    • Carefully weave battery-operated fairy lights through the garland for a magical glow.
  4. Attach to the Staircase:
    • Use floral wire or zip ties to secure the garland to the staircase railing.
    • Ensure the garland is evenly distributed and securely fastened.

Tips:

  • Customise Your Garland: Tailor your garland to your personal style and colour scheme.
  • Layer Your Decorations: Mix and match different textures and colours for a visually appealing garland.
  • Consider the Scent: Incorporate fragrant elements like cinnamon sticks and fresh greenery to fill your home with holiday aromas.
  • Safety First: If using real candles or electric lights, exercise caution and follow safety guidelines.
  • Maintain Freshness: For fresh greenery, mist it regularly to keep it hydrated and vibrant.
  • Clean Up: After the holiday season, carefully remove the garland and store it for future use.

By following these steps and tips, you can create a stunning Christmas staircase garland that will impress your guests and add a touch of festive cheer to your home.


Decorated Cake Idea: The Pet Portrait Cake

  The Pet Portrait cake is a sophisticated, multi-tiered confection that features a heartwarming, personalised surprise. While the overall ...