Wednesday, 31 July 2024

Persimmon and Chocolate Oatmeal Cookies Recipe


Persimmon and Chocolate Oatmeal Cookies

Persimmon and Chocolate Oatmeal Cookies: A Healthy Twist on a Classic

Ingredients:

1 cup rolled oats (old-fashioned oats work best)

1 ½ cups all-purpose flour

½ teaspoon baking soda

½ teaspoon salt

1 teaspoon ground cinnamon

½ cup unsalted butter, softened

¾ cup packed light brown sugar

1 large ripe Hachiya persimmon, peeled and mashed

1 large egg

1 teaspoon vanilla extract

½ cup chopped dark chocolate (60-70% cacao preferred)

Instructions:

  1. Preheat the Oven and Prepare Baking Sheets:
    • Preheat your oven to 180°C (350°F). Line baking sheets with parchment paper.
  2. Whisk Dry Ingredients:
    • In a medium bowl, whisk together the rolled oats, flour, baking soda, salt, and cinnamon. Set aside.
  3. Cream Butter and Sugar:
    • In a large bowl using an electric mixer, cream together the softened butter and brown sugar until light and fluffy.
  4. Incorporate Wet Ingredients:
    • Beat in the mashed persimmon, egg, and vanilla extract until well combined.
  5. Combine Wet and Dry Ingredients:
    • Gradually add the dry ingredients to the wet ingredients, mixing until just combined. Be careful not to over-mix.
  6. Fold in Chocolate:
    • Fold in the chopped dark chocolate using a rubber spatula.
  7. Shape and Bake the Cookies:
    • Drop rounded tablespoons of dough onto the prepared baking sheets, leaving space between them for spreading.
    • You can gently press a few extra chocolate chunks onto the top of each cookie for a more decadent look (optional).
  8. Bake:
    • Bake the cookies for 10-12 minutes, or until the edges are golden brown and the centres are slightly soft.
  9. Cool and Enjoy:
    • Let the cookies cool on the baking sheets for a few minutes before transferring them to a wire rack to cool completely.

Tips:

  • For a chewier cookie, bake for 10 minutes. For a crispier cookie, bake for 12 minutes.
  • If your Hachiya persimmon is very soft, you may want to drain some of the excess moisture before mashing it.
  • You can substitute chopped walnuts, pecans, or dried cranberries for the chocolate chips, or add a combination of these ingredients.
  • Leftover cookies can be stored in an airtight container at room temperature for up to 3 days.

Nutrition Information (per cookie):

  • Calories: Approximately 250-300 (depending on ingredients and size)
  • Fat: 10-15g
  • Carbohydrates: 30-35g
  • Protein: 5g

Enjoy these delicious and healthy Persimmon and Chocolate Oatmeal Cookies!


Tuesday, 30 July 2024

Spring's Beauty in Handmade Cards


Handmade Cards

Pressed Spring Symphony: Capture Spring's Beauty in Handmade Cards

Pressed Spring Symphony invites you to create beautiful and unique greeting cards adorned with the delicate charm of pressed spring flowers. These cards are a delightful way to share a heartfelt message, infused with the vibrant colours and textures of springtime.


Materials:

  • Fresh spring flowers: Select a variety of colourful spring blooms such as pansies, violets, forget-me-nots, small blossoms from fruit trees, or young fern fronds. Ensure the flowers are free of blemishes and fully blooded but not wilting.
  • Heavyweight card-stock: Choose high-quality card-stock in a colour that complements your chosen flowers. Opt for a light colour if using vibrant flowers and a darker colour if using pale blooms.
  • Blotting paper: Blotting paper will help absorb moisture from the flowers during the pressing process.
  • Heavy books or a flower press (optional): Heavy books will apply pressure to flatten the flowers, while a flower press offers a more controlled pressing experience.
  • Scissors and tweezers: Scissors will be needed to trim the flowers, and tweezers will help with precise placement on the cards.
  • Glue stick or double-sided tape: A glue stick or double-sided tape will secure the pressed flowers to the card-stock.
  • Optional embellishments: Dried leaves, small paper cutouts, or a touch of glitter can add a personalised touch to your cards.

Instructions:

  1. Collecting the flowers: Gather your chosen spring blooms early in the morning when they are fresh and free of dew.
  2. Preparing the flowers: Gently remove any leaves or debris from the flowers. Using scissors, trim the stems to a manageable size.
  3. Arranging the flowers: On a clean, flat surface lined with blotting paper, arrange the flowers in your desired design on the card-stock. Consider experimenting with different layouts to create unique compositions.
  4. Pressing the flowers: Cover the arranged flowers with another sheet of blotting paper. Place the covered card-stock between heavy books or within a flower press. Apply gentle pressure for a minimum of 3-4 weeks, checking on the flowers periodically and replacing the blotting paper if it becomes damp.
  5. Checking for dryness: Once the flowers are completely dry and paper-thin, carefully remove them from the press.
  6. Attaching the flowers: Using a glue stick or double-sided tape, adhere the pressed flowers onto the card-stock according to your initial design.
  7. Adding a message (optional): On the inside of the card, write your personalised message with a pen that complements the overall design.
  8. Embellishing (optional): If desired, add a touch of personalisation with dried leaves, small paper cutouts, or a sprinkle of glitter.

Tips:

  • Flower selection: Choose flowers with a flat profile for easier pressing. Experiment with different varieties to discover which ones press well.
  • Drying time: The pressing time may vary depending on the thickness and moisture content of the flowers. Be patient and ensure they are completely dry before adding them to the card.
  • Card-stock colour: Opt for a card-stock colour that allows the pressed flowers to stand out. White or cream card-stock is a classic choice, but pastel colours can also work well.
  • Design inspiration: Look for inspiration in nature for your card designs. Consider mimicking a flower bouquet or focusing on a single flower as the main element.
  • Gifting and personalisation: Pressed Spring Symphony cards make delightful handmade gifts for birthdays, anniversaries, or simply to express your appreciation.

With a touch of creativity and the vibrant beauty of spring flowers, you can create unique and heartfelt greeting cards that capture the essence of the season. Let your Pressed Spring Symphony cards blossom and spread joy with every message.


Monday, 29 July 2024

Flourless Chocolate Peanut Butter Cookies Recipe


Flourless Chocolate Peanut Butter Cookies

Flourless Chocolate Peanut Butter Cookies: A Dreamy Gluten-Free Treat

Ingredients:

1 cup (2 sticks) creamy peanut butter (not natural)

½ cup packed light brown sugar

1 large egg

1 teaspoon pure vanilla extract

½ teaspoon baking soda

¼ teaspoon salt

¼ cup unsweetened cocoa powder

½ cup semisweet chocolate chips (or chopped dark chocolate)

Optional:

  • Flaky sea salt, for sprinkling

Instructions:

  1. Preheat your oven to 350°F (175°C) and line a baking sheet with parchment paper.
  2. In a large bowl, cream together the peanut butter and brown sugar until smooth.
  3. Beat in the egg and vanilla extract until well combined.
  4. In a separate bowl, whisk together the baking soda, salt, and cocoa powder. Gradually add the dry ingredients to the wet ingredients, mixing until just combined.
  5. Fold in the chocolate chips.
  6. Using a spoon or cookie scoop, portion the dough onto your prepared baking sheet, leaving space for spreading.
  7. (Optional) Sprinkle the tops of the cookies with flaky sea salt for a sweet and salty contrast.
  8. Bake for 10-12 minutes, or until the edges are set but the centres are still slightly soft. The cookies will continue to firm up as they cool.
  9. Let the cookies cool completely on the baking sheet before transferring them to a wire rack to cool completely.

Tips:

  • For chewier cookies, bake for 10 minutes. For crispier cookies, bake for 12 minutes.
  • If your peanut butter is very dry, you can add a tablespoon or two of milk to the batter to achieve the right consistency.
  • Make sure your oven is preheated before baking for optimal results.
  • Allow the cookies to cool completely before storing them in an airtight container at room temperature. They will keep for up to 3 days.

Nutritional Information (per cookie):

  • Calories: 320
  • Fat: 18g
  • Saturated Fat: 8g
  • Cholesterol: 35mg
  • Sodium: 130mg
  • Carbohydrates: 32g
  • Sugar: 22g
  • Protein: 6g

Note: This nutritional information is an estimate and may vary slightly depending on the specific ingredients you use.

Enjoy these delicious and easy Flourless Chocolate Peanut Butter Cookies!


Sunday, 28 July 2024

Succulent Serenity Stones


Succulent Serenity Stones

Succulent Serenity Stones: Carry a Pocketful of Calm

In our fast-paced world, finding moments of peace and tranquility can be a challenge. Succulent Serenity Stones offer a charming solution. These beautiful stones, adorned with miniature succulents, serve as a constant reminder to slow down, breathe deeply, and reconnect with the grounding energy of nature. Not only are they aesthetically pleasing, but the calming properties of succulents are believed to promote feelings of relaxation and well-being.


Materials:

  • Stones: Select smooth, flat stones with a surface area large enough to accommodate a small succulent. Choose stones with interesting textures or colours that resonate with you. River rocks, beach stones, or polished gemstones are all excellent options.
  • Succulents: Opt for small, slow-growing succulent varieties that can thrive in a limited space. Here are some ideal choices:
    • Jade Plant (Crassula Ovata)
    • Hens and Chicks (Sempervivum)
    • Living Stones (Lithops)
    • Aloe Vera Buttons (Aloe Vera Variegata)
    • String of Pearls (Senecio Rowleyanus)
  • Fast-drying adhesive: Choose a strong, quick-drying adhesive suitable for adhering plants to rocks.
  • Topsoil: A small amount of well-draining succulent potting mix.
  • Optional decorative elements: Tiny pebbles, sand, or moss can add visual interest and texture to your Serenity Stones.

Instructions:

  1. Clean the stones: Wash the stones thoroughly with warm, soapy water and dry them completely.
  2. Prepare the succulents: If necessary, gently remove any excess soil from the roots of your succulents.
  3. Apply adhesive: Using a toothpick or craft stick, apply a small amount of adhesive to the flat surface of the chosen stone.
  4. Attach the succulent: Carefully position the succulent onto the adhesive-covered area of the stone, ensuring good root contact. Hold it in place for a few seconds to allow the adhesive to set.
  5. Apply topsoil (optional): If desired, sprinkle a thin layer of topsoil around the base of the succulent to secure it further and create a finished look.
  6. Decorate (optional): Using tweezers, carefully add small pebbles, sand, or moss around the base of the succulent to create a miniature landscape.

Tips:

  • Light: Succulents require bright, indirect sunlight. Avoid placing your Serenity Stones in full sun, which can scorch the plants.
  • Watering: Water your Serenity Stones sparingly. When the soil feels completely dry to the touch, immerse the stone in water for a few seconds, then allow it to drain completely before returning it to its place. Overwatering is the most common cause of succulent failure.
  • Placement: Display your Serenity Stones in a location where you will see them frequently, such as your office desk, bedside table, or windowsill. Gazing at the calming presence of the succulents can help reduce stress and promote feelings of peace.
  • Refresh and revive: With proper care, your succulent Serenity Stones can thrive for months. If a succulent becomes unhealthy or outgrows its space, you can carefully remove it and replace it with a new one.

By creating your own Succulent Serenity Stones, you'll not only have a beautiful and unique decorative item, but also a constant reminder to embrace moments of calm and tranquility in your everyday life.


Sundress for Summer


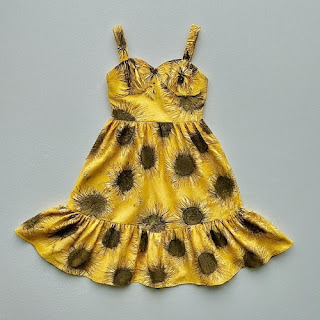
Sunflower Sundress

Pattern: Sunflower Sundress

This sleeveless sundress features a fitted bodice with a sweetheart neckline and a flowing, tiered skirt adorned with a vibrant sunflower print.

Materials:

2-3 yards (depending on size) of woven cotton fabric with a sunflower print

Coordinating thread

Sewing machine

Fabric scissors

Measuring tape

Pins

Iron

Zipper (optional)

Construction:

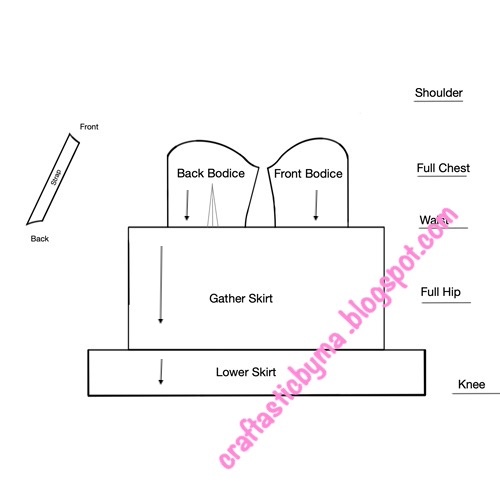
  1. Measure: Take your bust, waist, and hip measurements to create a basic bodice pattern. You can find free online resources or use a pre-existing bodice pattern as a guide.
  2. Cut the Bodice: Cut out the bodice front and back pieces from your fabric according to your pattern.
  3. Create the Bodice: Sew the shoulder seams of the bodice pieces together. Finish the neckline with a bias binding or facing. If desired, insert a zipper for easier wear at the centre back seam.
  4. Cut the Skirt: The skirt will consist of two tiers. You can use the full width of the fabric or cut panels for each tier. Measure the desired length for each tier and add seam allowances. Cut two rectangles of fabric for each tier from the sunflower fabric.
  5. Assemble the Skirt: Sew the side seams of each tier separately. Gather the top edge of each tier using a gathering stitch.
  6. Attach the Skirt: Attach the top gathered edge of the first tier to the bottom of the bodice. Repeat with the top gathered edge of the second tier, attaching it to the bottom edge of the first tier.
  7. Finishing Touches: Hem the bottom edge of the skirt to your desired length. Iron the seams flat for a crisp finish.

Tips:

  • Use a contrasting solid colour fabric for the bodice for a bolder look.
  • Add pockets for a more casual vibe.
  • Experiment with different sleeve lengths, like a flutter sleeve or a cap sleeve.
  • For a beginner-friendly option, consider using a pre-made bias tape for the neckline and hemming.

Remember: This is a basic guideline. Feel free to adjust the design and construction details to suit your skill level and desired look. There are many online tutorials and resources available to help you with specific sewing techniques.

I hope this inspires you to create your own stylish sundress!


Draft
Pattern


Persimmon and Goat Cheese Pizza Recipe


Persimmon and Goat Cheese Pizza

Persimmon and Goat Cheese Pizza: A Fall Flavour Explosion

This gourmet pizza recipe combines the sweetness of persimmons with the tanginess of goat cheese, creating a unique and delicious autumnal treat.


Ingredients:

  • For the Pizza Dough (makes 1 pizza):
    • 1 1/2 cups all-purpose flour
    • 1 teaspoon active dry yeast
    • 1 teaspoon sugar
    • 1 teaspoon salt
    • 1 tablespoon olive oil
    • 1/2 cup warm water (105°F to 115°F)
  • For the Toppings:
    • 1 tablespoon olive oil
    • 1 large yellow onion, thinly sliced
    • 2 ripe Fuyu persimmons, thinly sliced
    • 4 ounces goat cheese, crumbled
    • 2-3 sprigs fresh thyme
    • Honey for drizzling
    • Salt and freshly ground black pepper, to taste

Instructions:


1 Make the Pizza Dough:

    • In a large bowl, whisk together the flour, yeast, sugar, and salt.
    • Add the olive oil and warm water to the dry ingredients and mix until a shaggy dough forms.
    • Turn the dough onto a lightly floured surface and knead for 5-7 minutes, or until smooth and elastic.
    • Place the dough in a lightly oiled bowl, cover with plastic wrap, and let rise in a warm place for 1 hour, or until doubled in size.


2 
Prepare the Toppings:

    • Heat the olive oil in a skillet over medium heat.
    • Add the sliced onion and cook, stirring occasionally, until softened and caramelised, about 15-20 minutes. Season with salt and pepper to taste.


3 Assemble and Bake the Pizza:

    • Preheat your oven to 475°F (245°C) with a baking stone or pizza stone inside (if using).
    • Once the dough has risen, punch it down on a lightly floured surface and roll it out into a 12-inch circle.
    • Transfer the dough to a pizza peel or baking sheet dusted with cornmeal.
    • Spread the caramelised onions evenly over the dough, leaving a 1-inch border around the edge.
    • Arrange the persimmon slices on top of the onions.
    • Sprinkle crumbled goat cheese over the pizza.
    • Top with fresh thyme sprigs.

4 Bake:

    • Slide the pizza onto the preheated baking stone (or bake directly on a baking sheet) and bake for 10-12 minutes, or until the crust is golden brown and the cheese is melted and bubbly.


5
Finishing Touches:

    • Drizzle the cooked pizza with honey to taste.
    • Season with additional salt and freshly ground black pepper, if desired.
    • Let the pizza cool slightly before slicing and serving.


Tips:

  • You can use store-bought pizza dough to save time. Look for pre-made dough in the refrigerated section of your grocery store.
  • If you don't have a pizza stone, you can bake the pizza on a baking sheet. However, a pizza stone will help achieve a crispier crust.
  • For a vegetarian option, you can omit the goat cheese.
  • You can experiment with different types of cheese, such as blue cheese or a mozzarella and goat cheese blend.
  • Leftover pizza can be stored in the refrigerator for up to 3 days. Reheat in the oven or a toaster oven until warmed through.

Nutrition Information (per slice):

  • Calories: Approximately 400-500 (depending on the ingredients)
  • Fat: 20-25g
  • Carbohydrates: 40-50g
  • Protein: 15-20g

Enjoy this delicious and unique Persimmon and Goat Cheese Pizza!

Steamed Egg Custard for Chinese New Year

  Steamed Egg Custard for Chinese New Year Yields: 4 servings Prep time: 15 minutes Cook time: 20 minutes Ingredients: 4 large eggs 1/2 cup ...